

Best AI Animation Software: A Practical Workflow Toolkit
Oct 13, 2026

Why AI Animation Tooling Changed the Production Conversation
Animation has always been a discipline defined by bottlenecks. A single second of finished character animation can represent dozens of drawings, hours of rigging, or days of keyframe polishing. That cost structure shaped everything: which stories got told, how many revision rounds a client could afford, and how long a studio could survive between milestones. When iteration is expensive, directors stop experimenting. They lock shots early, protect the schedule, and settle for ideas that were good enough on the first pass.
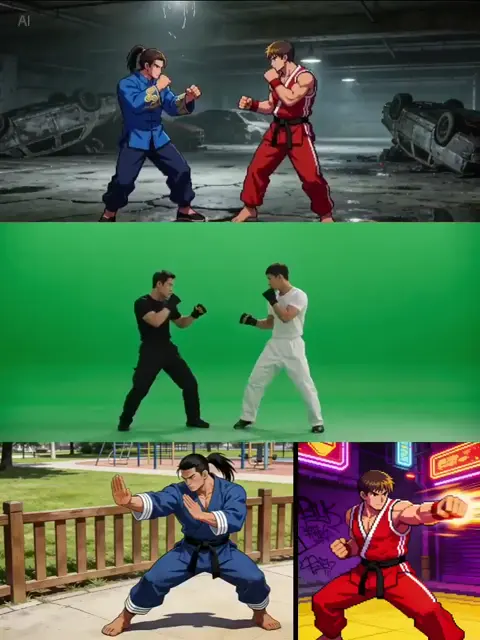
The arrival of practical generative video and animation tools changed that economic reality. Not because software now produces finished animation on demand, but because it collapsed the cost of the first draft. A storyboard panel can become a moving animatic in minutes. A rough blockout can be rendered in a dozen stylistic directions before lunch. A performance captured on a phone can be retargeted onto a stylised character without a mocap stage.
That shift matters most for small teams. A two-person content studio can now pitch three visual directions instead of one. An independent animator can test an idea before committing a month to it. A larger studio can use generated passes as previsualisation, then hand the approved motion to traditional animators for final quality. The tooling does not erase craft; it moves craft later in the pipeline, where human judgement adds the most value.
This guide is a practical toolkit rather than a ranked list. The right combination depends on your output format, your team size, and how much control you need over the frame. Below you will find how these systems work, which categories of tools exist, how to evaluate them, a complete end-to-end workflow, and the mistakes that consistently derail AI-assisted animation projects.
How Generative Animation Tools Actually Work
Understanding the mechanics makes tool selection far easier, because every limitation you encounter traces back to one of a few technical realities.
Diffusion models generate frames by starting from noise and progressively denoising it toward an image that matches a text prompt and any conditioning signals. Quality improves with more denoising steps, but so does render time. Most engines let you trade speed against fidelity, which is why low-resolution drafts are so cheap and final-resolution renders are not.
Temporal layers are what separate video generation from image generation. A model must keep the same character, lighting, and background stable across dozens or hundreds of frames. Engines handle this with temporal attention, optical flow guidance, or by generating keyframes and interpolating between them. When temporal logic fails, you see the classic artefacts: flickering textures, morphing faces, and backgrounds that subtly rearrange themselves.
Control signals give you directorial authority. Depth maps, pose skeletons, edge maps, segmentation masks, and camera-motion parameters let you constrain generation so the output respects your blocking rather than inventing its own. If you want repeatable results, control signals matter more than prompt wording.
Style adapters — small trained weights often called LoRAs or style references — encode a specific look: your character's line quality, your brand's colour palette, a particular rendering style. Training a lightweight adapter on twenty to fifty well-chosen reference images usually produces far more consistent output than any amount of prompt engineering.
In-betweening and interpolation models take two approved frames and generate the motion between them. This is where AI-assisted animation gets genuinely useful for traditional pipelines, because the artist retains control of the extremes and the model handles the tedious middle.
The Main Categories of AI Animation Tools
Text-to-video and image-to-video engines
These are the headline tools: Runway, Kling, Luma Dream Machine, Pika, Sora, Veo, and open-source stacks built on Stable Diffusion with AnimateDiff or similar motion modules. Text-to-video is best for concept work and mood pieces. Image-to-video is far more controllable, because your starting frame already fixes composition, character design, and lighting.
Motion transfer and performance capture
Tools such as Wonder Studio, Rokoko Vision, Move AI, and DeepMotion extract skeletal motion from ordinary video and retarget it onto a 3D or 2D character. For dialogue-heavy scenes and physical comedy, performance capture is often faster and more expressive than keyframing. The trade-off is cleanup: hand intersections, foot sliding, and jittery fingers usually need a pass in Blender, Maya, or Cinema 4D.
Character consistency and style control
This category includes reference-image conditioning, character-lock features, trained adapters, and node-based pipelines like ComfyUI that let you chain identity, pose, and style conditioning together. If your project has recurring characters, invest here first. Nothing undermines a finished piece faster than a protagonist whose face changes between shots.
Lip sync, dubbing, and voice
Sync tools align mouth shapes to an audio track, and modern versions handle multiple languages and emotional delivery. For animation, the important question is stylistic: does the tool respect your character's mouth design, or does it paste a photoreal mouth onto a stylised face? Test with your own character before committing.
Cleanup, in-betweening, and rotoscoping
Rotoscoping assistants, matte extraction, and automatic in-betweening are the unglamorous tools that save the most hours. EbSynth-style approaches, which paint one frame and propagate that style across a sequence, remain one of the most efficient ways to stylise live-action footage into animation.
Upscaling, interpolation, and finishing
Topaz Video AI, RIFE-based frame interpolation, and denoising tools handle the last mile. Generating at 720p and upscaling to 4K is dramatically cheaper than generating at final resolution, and frame interpolation can lift 24 fps output to 60 fps when a client demands smooth motion.
How to Choose: Decision Criteria That Actually Matter
Forget feature lists. Evaluate candidates against these dimensions:
Structural control. Can you specify camera movement, character blocking, and timing? Tools that only accept a text prompt will frustrate you on anything longer than a few seconds.
Consistency mechanisms. Look for reference images, seed locking, identity conditioning, and adapter training. Ask what happens across a 10-shot sequence, not a single clip.
Output specifications. Check maximum clip length, resolution, frame rate, codec support, and whether you can export alpha channels or image sequences. Compositing is where animation is finished, and a tool that only exports MP4 will slow you down.
Iteration speed. How long does one variation take? A model that produces beautiful frames in twelve minutes may be less useful than a faster one you can iterate on twenty times.
Commercial licensing. Read the terms for commercial use, output ownership, and indemnification. This varies enormously between vendors and is not something to discover after delivery.
Cost predictability. Usage-based pricing scales badly if your team experiments freely. Fixed-seat subscriptions are easier to budget; metered systems reward discipline. Model your real monthly volume before choosing.
Pipeline fit. API access, scripting support, file naming, and integration with your existing tools matter more than any single feature at scale.
Data handling. If you are working on unreleased client material, confirm whether your inputs are used for model improvement and whether you can opt out.
A Practical End-to-End AI Animation Workflow
Step 1: Preproduction and the style bible
Before generating anything, write a short style bible: character reference sheets with front, three-quarter, and profile views; a colour script; three to five reference stills that capture the target look; and a motion vocabulary describing how characters move. Every consistency problem downstream traces back to a vague style bible.
Step 2: Storyboards and animatics
Build the storyboard with whatever you already use, then convert panels into moving animatics with an image-to-video engine. Keep the animatic rough — this pass exists to test timing and staging, not beauty. Set your edit to temp music now, because rhythm drives everything afterwards.
Step 3: Shot generation
Generate shot by shot, never sequence by sequence. Lock each shot's first frame as an approved still, then animate from it. Work at draft resolution with fewer denoising steps, generate four to six variations, and pick the best. Only after a shot is selected should you render it at higher quality.
Step 4: Motion, performance, and camera
Where acting matters, capture a performance on video and retarget it. Where camera language matters, use control signals — depth passes, 3D blockouts, or reference footage — rather than hoping the prompt interprets "slow dolly in" correctly. For 3D-led work, Unreal Engine or Blender provides the layout pass that the generative model then stylises.
Step 5: Assembly, cleanup, and compositing
Import everything into After Effects, DaVinci Resolve, or Nuke. Fix flicker with deflicker or frame-blending passes, repair hands and faces with paint or inpainting, and stabilise backgrounds with tracking. This stage often consumes more time than generation, and budgeting for it is what separates professional results from demos.
Step 6: Sound, lip sync, and finishing
Record or generate dialogue, then run sync. Add foley and ambience — AI-assisted animation tends to feel lifeless without tactile sound. Finish with colour grading, upscaling, and grain or texture passes to unify shots that came from different models.
Consistency Is the Hardest Problem in AI Animation
Ask any animator what breaks AI-assisted projects and the answer is continuity. Fixing it requires a system, not luck.
Lock identity early. Approve a character sheet and use it as a reference image in every generation. If your tool supports trained adapters, train one per principal character.
Separate style from content. Keep a consistent style reference across the whole project while varying pose and composition. Mixing style references mid-project is the fastest way to create a patchwork look.
Manage seeds deliberately. Reuse seeds when you want visual continuity between related setups, and change them when you want variety. Keep a log mapping seeds to shots.
Normalise environments. A background that shifts slightly between shots reads as an error. Generate environments once as high-quality stills and reuse them as backdrops.
Do a continuity pass. Before final render, watch the whole sequence at low resolution and list every inconsistency. Fix them in one batch rather than shot by shot.
Common Mistakes and How to Fix Them
Generating at final resolution from the start. You will burn time and money on shots you discard. Always approve at draft quality first.
Over-relying on prompts. If your output is unpredictable, add control signals instead of more adjectives.
Skipping the animatic. Teams that jump straight to polished generation lose the ability to restructure the story cheaply, which is the main advantage the workflow offers.
Ignoring audio until the end. Lip sync and timing decisions need locked dialogue. Generate audio early, even as a placeholder scratch track.
Accepting the first good-looking output. Visual appeal hides structural problems. Check motion arcs, weight, and whether the shot actually communicates the story beat.
No versioning discipline. Name files with project, sequence, shot, version, and date. Generative pipelines produce dozens of variants per shot; without naming rules, you will lose the good one.
Assuming one tool fits all. Most professional pipelines combine an image model, a video engine, a motion-capture tool, an in-betweening pass, and a finishing suite. Specialisation beats brand loyalty.
Studio Integration: Storage, Review, and Handoff
Generative workflows produce far more data than traditional pipelines. A single shot can spawn gigabytes of iteration files. Plan for it.
Keep a tiered storage structure: fast local NVMe for active shots, shared network storage for review versions, and archive storage for raw generations you may need later. Render at draft resolution for review and reserve full renders for approved shots.
Establish a review protocol with clear approval gates — storyboard lock, animatic lock, shot approval, picture lock — and make sure reviewers comment on the right version. Cloud review tools that allow frame-accurate annotation save enormous back-and-forth.
For handoff, standardise deliverables: image sequences or ProRes for editorial, layered files for compositing, and a documented shot list noting which shots were AI-assisted and which were traditional. This documentation matters for client transparency and for future revisions.
Licensing, Ethics, and Originality
Ask three questions before adopting any tool on client work. Who owns the output, and does the vendor grant commercial rights? Was the model trained on material you would be comfortable using? And can you disclose your process honestly if a client or audience asks?
Studios increasingly maintain internal policies requiring disclosure of AI-assisted shots, restrictions on generating living performers' likenesses without consent, and prohibition on training custom adapters on copyrighted third-party work. Building your own policy early avoids painful conversations later.
Originality is a craft question as much as a legal one. The most defensible AI-assisted animation uses generated passes as scaffolding — for previz, texture, and iteration — while the final creative decisions come from human direction: staging, performance, timing, and design. That combination tends to produce work that is both faster to make and distinctly yours.
FAQ
Do I still need to learn traditional animation principles?
Yes, and more than ever. Squash and stretch, anticipation, and follow-through are what make generated motion read as intentional. The models handle rendering; you handle believability.
Can AI animation tools produce a full short film?
They can produce all the imagery, but you still need a script, an edit, sound design, and continuity management. Treat them as a production accelerator, not a production replacement.
Which tool is best for character consistency?
Any engine paired with reference-image conditioning and a trained style or character adapter. The consistency comes from your reference materials and adapter discipline more than from the vendor.
How long does a one-minute AI-assisted animation take?
For a small team with an established style bible, expect roughly one to three weeks from script to finished minute, depending on how much cleanup and original 2D or 3D work you layer in.
Is it cheaper than traditional animation?
Usually, for concept and previz stages. At final quality, the savings depend heavily on how much cleanup the shots require. Compute your own pipeline rather than trusting general claims.
Should I generate at 24 fps or 60?
Match your delivery format. Animate at 24 fps on twos for a hand-drawn feel, then interpolate only if the client requests smoother motion.
How do I avoid a generic look?
Use a specific style bible, train adapters on your own artwork, and control lighting and palette deliberately. Generic output usually signals generic references.
What should I learn first?
Start with image-to-video generation plus one compositing tool. Master consistent shot generation before adding motion capture, 3D, or upscaling to your stack.
The toolkit is genuinely powerful, but it rewards planning over novelty. Build the style bible, lock your animatic, generate in drafts, fix consistency systematically, and finish with real sound and real editing judgement. Do that, and AI-assisted animation stops being a demo trick and becomes a reliable part of how you ship work.

Alexander
More Blogs
Read MoreMontaggio video rapido: transizioni e software per l'AI
Guida pratica al montaggio video rapido con AI: transizioni fluide, software, workflow, coerenza visiva, errori da evitare e FAQ operative.
Building an AI Video Production Workflow From Concept to Cut
A practical guide to planning, generating, editing, and finishing AI-assisted videos with consistent characters, clear shot lists, and reliable review loops.
A Repeatable Post-Production Workflow for Polished AI Video
Build a repeatable AI video post-production pipeline: organize assets, cut story-first, design transitions, refine audio, and review versions calmly.