
AI Photorealistic Image Generator: Cinematic Stills Guide
Oct 13, 2026
Why AI photorealistic stills became a serious cinematic tool
For years, AI images were easy to spot. Skin looked waxy, hands melted, and lighting behaved like a video game render. That era is fading. Modern diffusion models, hybrid transformers, and reference-guided pipelines can now produce stills with believable skin pores, fabric weave, lens falloff, and practical light spill. The result is that directors, concept artists, storyboard teams, and solo creators can generate cinematic frames before a camera is ever booked.
The practical shift is not just about prettier images. It is about speed and control. A location that would take weeks to secure can be visualized in an afternoon. A costume concept can be tested under golden-hour backlight, neon rain, or hard midday sun without renting a studio. A shot list can be explored with different lens choices and blocking patterns. Used well, AI photorealistic image generation becomes a previsualization engine, a moodboard factory, and a look-development lab in one.
That said, cinematic stills are not the same as generic AI art. A cinematic frame has a point of view. It uses composition, depth, light, and texture to tell a story in a single image. The tools matter, but the workflow matters more. You need a repeatable process for briefs, prompts, references, refinement, consistency, and finishing. This guide walks through that process with a focus on photorealistic results that feel like frames from a film rather than random renders.
What makes a still feel cinematic?
Cinematic quality is a bundle of visual cues. Some are technical, some are artistic, and some are cultural. Understanding them helps you write better prompts and choose better tools.
Light, lens, and material realism
Cinematic light rarely looks flat. It has direction, contrast, color temperature, and motivation. A face may be lit by a window, a practical lamp, a phone screen, or a passing car. Shadows have shape. Highlights bloom slightly. Materials respond in specific ways: leather catches specular highlights, wool absorbs light, glass refracts, metal reflects the environment.
Lens behavior is equally important. A wide lens exaggerates space and distorts edges. A long lens compresses distance and isolates the subject. Shallow depth of field separates foreground from background, but too much blur can feel artificial. Real lenses also produce subtle vignetting, chromatic aberration, halation, and focus breathing. These imperfections often signal realism more than raw resolution.
Composition and blocking
A cinematic still usually has a clear subject, a supporting environment, and negative space that guides the eye. Blocking matters: where characters stand, how they relate to each other, and what the camera sees. Rule of thirds, centered symmetry, leading lines, and frame-within-frame compositions all work. What matters is intention. A random beautiful render can still feel empty if the composition says nothing.
Texture and imperfection
Perfect skin, perfect walls, and perfect skies feel synthetic. Real images contain dust, scratches, wrinkles, flyaway hair, uneven paint, and sensor noise. Adding controlled imperfections at the right stage can push a still from illustration to photograph. The key is restraint. A little grain, a slight lens flare, and natural skin texture are usually enough.
Choosing the right AI photorealistic image generator
There is no single best tool for every cinematic still. The right choice depends on your subject, your control needs, your compute setup, and your finishing workflow. Instead of chasing the newest model, evaluate tools against the criteria below.
Evaluate core image quality
Start with skin, eyes, hands, and hair. Generate close-up portraits under different lighting conditions. Look for natural pore structure, realistic eye reflections, and believable hair strands. Then test environments: wet streets, interiors with mixed lighting, landscapes with atmospheric depth. A model that excels at portraits may struggle with architecture or vehicles. Build a small test suite and run every candidate through it.
Test control features
Control is what separates a toy from a production tool. Look for image prompts, style references, depth maps, pose guides, edge detection, inpainting, outpainting, and regional prompting. If you need consistent characters, check whether the tool supports character references or training a small custom model. If you need specific camera angles, see whether it accepts 3D guides or camera metadata. The more control you have, the less time you spend rerolling.
Compare workflow fit
A generator that produces beautiful single images may be frustrating in a sequence. Ask how easy it is to reuse seeds, save presets, batch-generate variations, and export metadata. If you work with a team, consider collaboration features, asset management, and review tools. If you work alone, speed and a clean interface may matter more. The best tool is the one that fits your actual pipeline, not the one with the loudest demo.
Building a repeatable still generation workflow
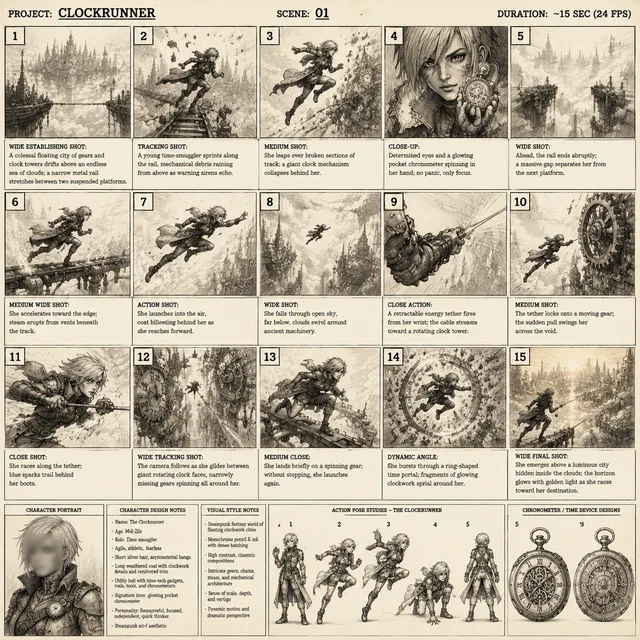
Great cinematic stills rarely come from a single prompt. They come from a loop: brief, generate, evaluate, refine, and finish. The following workflow is flexible enough for different tools but structured enough to deliver consistent results.
1. Write a visual brief
Before you open a generator, write a short brief. Include the story beat, the subject, the location, the time of day, the mood, and the camera intention. For example: 'A detective stands in a rain-soaked alley at night, lit by a single overhead sodium lamp. The camera is low and slightly wide, emphasizing isolation. The color palette is teal and amber with deep shadows.' A brief keeps you from drifting and makes it easier to judge whether an output works.
2. Build a prompt formula
A useful prompt formula covers subject, action, environment, lighting, lens, composition, mood, and finish. You do not need to use every category every time, but a consistent order helps you debug. For example: 'Middle-aged detective, wet coat, standing still, narrow alley, heavy rain, sodium vapor overhead light, 35mm lens, low angle, teal and amber palette, shallow depth of field, subtle film grain, photorealistic.' Keep the language concrete. Replace vague words like 'beautiful' with visual instructions like 'soft rim light' or 'high contrast shadows.'
3. Use references and controls
Text alone is a blunt instrument. Reference images, depth maps, and pose guides give the model spatial information. If you have a location photo, use it as a composition reference. If you need a specific pose, use a pose guide. If you need consistent lighting, use a lighting reference. Many tools also support style references, which can help maintain a color grade or texture across a set.
4. Refine with inpainting and local edits
The first generation is a draft. Use inpainting to fix hands, eyes, props, and background details. Use outpainting to expand the frame when you need more environment. Use regional prompts to adjust one area without changing the whole image. Refinement is where a good still becomes a great one. Work from large shapes to small details: composition first, then lighting, then texture, then tiny artifacts.
5. Finish with upscaling and grain
Upscaling can add resolution, but it can also exaggerate artifacts. Use a gentle upscaler and compare before and after. After upscaling, add a light film grain, subtle halation, and a consistent color grade. Avoid over-sharpening. A cinematic image often has slightly soft edges and natural noise, not clinical crispness. If you plan to use the still in video, finish in a color space that matches your editing pipeline.
Consistency across a sequence of shots
A single cinematic still is impressive. A sequence that feels like the same film is powerful. Consistency is the hardest part of AI image generation, and it requires planning.
Character consistency
Character consistency depends on stable references. Use a character reference image, a trained model, or a detailed description that you reuse exactly. Keep clothing, hair, age, and distinguishing features in a locked prompt block. Generate multiple angles and expressions, then select the best reference for future shots. Small changes in wording can change a face dramatically, so keep your character notes in a separate file.
Location and set continuity
Locations need continuity too. Save a master wide shot and use it as a reference for closer angles. Keep architectural details, signage, furniture, and weather consistent. If the scene takes place at night, maintain the same practical lights and shadow directions. A location bible with reference frames and notes prevents accidental changes between shots.
Color and lighting continuity
Color and lighting should follow the story. If a scene starts in warm daylight and ends in cold fluorescent light, plan that progression. Use the same color grading reference across the sequence. Keep track of key light direction, color temperature, and contrast ratio. A simple spreadsheet or note card for each scene can save hours of correction later.
Shot-to-shot lens language
Lens choices communicate emotion. Wide lenses can feel immersive or distorted. Long lenses can feel intimate or voyeuristic. Normal lenses feel neutral. Decide on a lens language for the scene and stick to it. If you cut from a 24mm wide to an 85mm close-up, make that choice intentional. Consistency in lens language makes the sequence feel directed rather than assembled.
Simulating cinematic lighting and optics
Lighting and optics are where AI stills either shine or fall apart. You can guide them with specific language and references.
Practical lighting patterns
Study common film lighting patterns. Rembrandt lighting places a triangle of light on the cheek. Butterfly lighting creates a shadow under the nose. Split lighting leaves half the face in shadow. Backlight separates the subject from the background. Practical lights, like lamps and neon signs, add motivation and color. Use these terms in prompts and references to get more intentional results.
Lens and sensor emulation
Mention lens focal length, aperture, and sensor size when it matters. '50mm lens at f/1.8, full-frame sensor' gives the model useful cues. You can also reference film stocks for color and grain, but be careful not to overload the prompt. If the tool supports camera metadata or lens profiles, use them. For video workflows, matching lens characteristics across stills and motion shots helps the final edit feel cohesive.
Depth of field and focus falloff
Shallow depth of field is a hallmark of cinematic imagery, but it must be used with purpose. A portrait may benefit from a blurred background. A wide establishing shot usually needs deeper focus. Pay attention to focus falloff: the transition from sharp to blurred should feel natural. If the background looks like a painted blur, reduce the effect or add more environmental detail.
Grain, halation, and color science
Film grain, halation around bright highlights, and slight color shifts add organic texture. Use them subtly. Halation is common in night scenes with neon or practical lights. Grain should be fine and consistent. Color science matters too: skin tones should remain believable even under stylized grades. Test your final grade on different screens to avoid surprises.
From stills to moving images: AI video workflows
Photorealistic stills are not just final images. They are the foundation for AI video, animatics, and hybrid production.
Image-to-video as previz
Image-to-video tools can animate a still into a short clip. This is useful for previz, mood tests, and social content. Start with a strong still, then add subtle motion: a slow push-in, a slight parallax, drifting rain, or a character turning their head. Keep the motion simple. Overloading a shot with movement often exposes artifacts. Use the animated clip to test pacing before committing to a full production.
Animatics and shot planning
You can assemble stills into an animatic with camera moves, sound effects, and temporary dialogue. This helps you discover whether a sequence works before shooting. It also helps editors and VFX artists understand the intended look. A good animatic built from AI stills can communicate tone, rhythm, and composition faster than a written shot list.
Hybrid pipelines with real footage
AI stills can also support hybrid pipelines. Use them as matte paintings, set extensions, concept references, or texture sources. Match perspective, lighting, and grain when compositing with real footage. The goal is not to replace cinematography but to extend it. A director can walk onto set with a clear visual target, and the VFX team can use the same references to maintain continuity.
Common mistakes and how to fix them
Even with good tools, common mistakes can derail a cinematic still. Here are the most frequent problems and practical fixes.
Overprompting
Too many competing details confuse the model. If your prompt includes five lighting styles, three moods, and two camera angles, the output will be muddled. Fix it by prioritizing. Keep the most important three to five visual instructions and remove the rest. Generate variations with different priorities instead of stuffing everything into one prompt.
Inconsistent references
Mixing references from different sources can create Frankenstein results. If you use a face reference, a pose reference, and a lighting reference, make sure they are compatible. Test one reference at a time. When something breaks, remove the last reference you added. Consistency improves when references share similar lighting, perspective, and resolution.
Plastic skin and waxy textures
Plastic skin usually comes from over-smoothing or a model trained on heavily retouched images. Counteract it by asking for natural skin texture, visible pores, and subtle imperfections. Lower the strength of beauty filters or style presets. Add grain and avoid aggressive denoising. In post, reduce clarity and sharpening on skin while keeping eyes and hair crisp.
Bad hands, eyes, and text
Hands and eyes remain common trouble spots. Generate multiple variations and choose the best. Use inpainting to repair fingers, nails, and eye reflections. Text is even harder, so avoid relying on generated text unless the tool has strong typography control. For signage or titles, add text in post-production where you have full control.
Overprocessing
Over-sharpened, over-saturated, and over-detailed images look synthetic. Step back and compare your still to a real photograph. Real images have soft areas, imperfect focus, and natural color variation. Reduce contrast, lower saturation slightly, and add a touch of grain. Sometimes the most cinematic move is to do less.
Quality control, ethics, and release readiness
Before you call a still finished, run a quality check. Zoom in on eyes, hands, edges, and reflections. Check for impossible geometry, floating objects, and mismatched shadows. Look at the image on a phone, a laptop, and a large screen. If it holds up at all sizes, it is ready for review.
Ethics and rights matter as well. Do not use a real person's likeness without permission. Be careful with trademarks, logos, and copyrighted characters. If the image is used commercially, follow the terms of the tool you used and any applicable laws. Disclose AI involvement when required by a client, platform, or publication. Transparency builds trust and protects your work.
Also consider cultural context. AI models can reproduce stereotypes or inaccuracies. Review your images for unintended bias in casting, location, costume, and lighting. A diverse review team can catch issues early. The goal is not just a beautiful frame but a responsible one.
Practical tool categories and selection criteria
Rather than naming a single winner, think in categories. General-purpose generators are fast and flexible for ideation. Controlled generation suites offer depth maps, pose guides, and inpainting for precise work. Specialized finishing tools handle upscaling, grain, color, and compositing. You may use two or three tools in one pipeline.
When selecting tools, score them on image quality, control, speed, consistency, export options, and learning curve. Run a small project through each candidate. Generate a character portrait, a wide establishing shot, and a close-up with specific lighting. Then try to maintain consistency across three shots. The tool that survives that test is the one worth keeping.
FAQ
What is the best AI photorealistic image generator for cinematic stills?
There is no universal best. The right tool depends on whether you need maximum photorealism, precise control, fast iteration, or easy integration with video. Test candidates on portraits, environments, and consistent sequences. Choose the one that fits your workflow and produces reliable results.
How do I make AI images look less like AI?
Focus on natural skin texture, believable lighting, lens imperfections, and subtle grain. Avoid over-sharpening and over-saturation. Use references with real photographic qualities. Refine hands, eyes, and edges. Compare your image to real film stills and adjust until the synthetic tells disappear.
Can I use AI stills for video previsualization?
Yes. Stills are excellent for previz, animatics, and look development. You can animate them with image-to-video tools or use them as visual targets for live-action shoots. Keep motion simple and use the stills to communicate composition, lighting, and tone.
How do I keep characters consistent across multiple stills?
Use a locked character description, a reference image, or a trained custom model. Keep clothing, hair, and features consistent in your notes. Generate a reference sheet with multiple angles. Reuse the same reference whenever the character appears. Consistency is a process, not a single prompt.
What resolution should I generate at?
Generate at the highest native resolution your tool supports without artifacts, then upscale gently. For video workflows, consider the final output resolution and aspect ratio. Avoid upscaling too aggressively before you have fixed composition and details. Finish with grain and color grading after upscaling.
How important is post-processing?
Post-processing is where many cinematic stills become believable. Color grading, grain, halation, and subtle sharpening can unify an image. But post cannot fix a weak composition or inconsistent lighting. Get the foundation right in generation, then use post to polish.
Conclusion
AI photorealistic image generation has become a practical tool for cinematic storytelling. The best results come from a clear brief, thoughtful references, controlled generation, and patient refinement. Learn how light, lenses, and materials behave. Build consistency across shots. Use video workflows to test motion and pacing. Avoid overprompting and overprocessing. With a repeatable workflow, you can create stills that feel like frames from a film and use them to plan, pitch, and produce better visual stories.

Alexander
More Blogs
Read MoreVidu Q4 Alternatives: 4K AI Video Models Compared (2026)
Vidu Q4 alternatives compared: Kling 4.0, Seedance 2.5, Wan 3.0, and Runway Gen-4 — 4K support, input modes, durations, audio, and what each costs in credits on Domer.
Top 4K AI Image Generators in 2026: 5 Models Compared on Real Costs
The top 4K AI image generators on Domer compared: Flux 3 Klein, Nano Banana 2.1, GPT Image 2.5, GPT Image 2, and Nano Banana Pro — 4K credit costs, reference limits, and speed.
Nano Banana 2.1 vs GPT Image 2.5: Which Image Model Should You Use? (2026)
Nano Banana 2.1 vs GPT Image 2.5 Flare compared: credit costs per resolution, aspect ratios, reference images, text rendering, and which tasks fit each model.